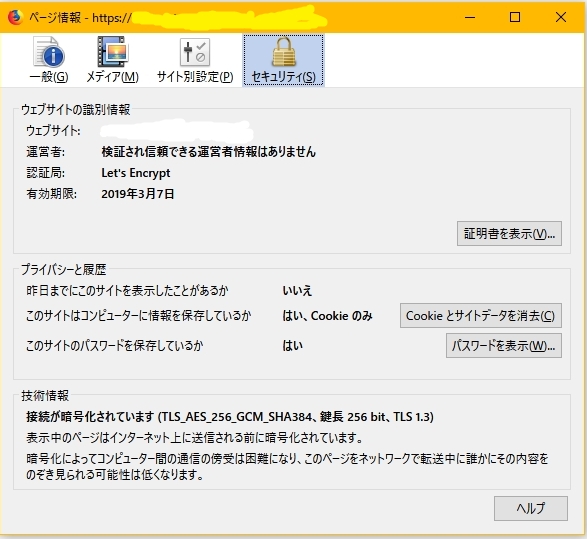
WindowsなnginxでTLS1.3を喋らせる

一般人なので自分用鯖がTLS1.3喋るよりゆづきずが喋ってくれた方がすっごいうれしい。
参考にしました
TLSv1.3 & HTTP/2 対応なwebサーバー構築 | Panasonic信者によるガジェットの知恵
nginxのソースコードからのビルド方法(Windows版) | 有限会社 WE WILL
nginxのWindows版バイナリをビルドする – digital matter
大体必要なことは書いてある公式
Building nginx on the Win32 platform with Visual C
必要そうなの
VisualStudio2017
MSYS2
ActivePerl(窓でうごくPerlなら何でもよさそう)
あると便利
git
VS2017は入れっぱなしで覚えてないのでググって
MSYS2は普通に最新版(x64)をダウンロード+インストールでpacman -Syuuしただけ
必要なタレの仕入れ
openssl/openssl
今回はOpenSSL_1_1_1-stable
PCRE download | SourceForge.net
今回はPCRE 8.4.2
あとZlib
nginx
nginx: download
Officalからだとauto/configureがないので
https://github.com/nginx/nginx.git
gitからmaster(現時点で1.15.7)
nginxのソースディレクトリーにobjsフォルダを作りそこにOpenSSL,Zlib,PCREのソースを投入
MSYS(MiniGWではない)でnginxのソースディレクトリを開いて
auto/configure --with-cc=cl \
--builddir=binary-x86 \
--with-debug --prefix= \
--conf-path=conf/nginx.conf \
--pid-path=logs/nginx.pid \
--http-log-path=logs/access.log \
--error-log-path=logs/error.log \
--sbin-path=nginx.exe \
--http-client-body-temp-path=temp/client_body_temp \
--http-proxy-temp-path=temp/proxy_temp \
--http-fastcgi-temp-path=temp/fastcgi_temp \
--http-scgi-temp-path=temp/scgi_temp \
--http-uwsgi-temp-path=temp/uwsgi_temp \
--with-cc-opt=-DFD_SETSIZE=1024 \
--with-select_module \
--with-http_v2_module \
--with-http_realip_module \
--with-http_addition_module \
--with-http_sub_module \
--with-http_dav_module \
--with-http_stub_status_module \
--with-http_flv_module \
--with-http_mp4_module \
--with-http_gunzip_module \
--with-http_gzip_static_module \
--with-http_auth_request_module \
--with-http_random_index_module \
--with-http_secure_link_module \
--with-http_slice_module \
--with-mail --with-stream \
--with-openssl=objs/openssl-1.1.1 \
--with-pcre=objs/pcre-8.42 \
--with-zlib=objs/zlib-1.2.11 \
--with-http_ssl_module \
--with-mail_ssl_module \
--with-stream_ssl_module
基本的には困っていたことはないのでデフォベースで。
うーん正直debugとかいらない気がする
あとflvとかmp4とかdavあたりはいらん人はいらんと思う
この辺参考になりそうなのでメモ
nginx configureオプション
OpenSSLのオプションでenable-tls1_3必要そうだったけれど普通に1.1.1で正式対応扱いみたいなのでいらなさそうですね
checking for OS
+ MSYS_NT-10.0 2.11.2(0.329/5/3) x86_64
+ using Microsoft Visual C++ compiler
+ cl version:
auto/cc/msvc: line 117: [: : integer expression expected
checking for MSYS_NT-10.0 specific features
creating binary-x86/Makefile

Configuration summary
+ using PCRE library: objs/pcre-8.42
+ using OpenSSL library: objs/openssl-1.1.1
+ using zlib library: objs/zlib-1.2.11

nginx path prefix: ""
nginx binary file: "/nginx.exe"
nginx modules path: "/modules"
nginx configuration prefix: "/conf"
nginx configuration file: "/conf/nginx.conf"
nginx pid file: "/logs/nginx.pid"
nginx error log file: "/logs/error.log"
nginx http access log file: "/logs/access.log"
nginx http client request body temporary files: "temp/client_body_temp"
nginx http proxy temporary files: "temp/proxy_temp"
nginx http fastcgi temporary files: "temp/fastcgi_temp"
nginx http uwsgi temporary files: "temp/uwsgi_temp"
nginx http scgi temporary files: "temp/scgi_temp"
うまくいけばこんな感じになるっぽい(要するにMakefileが出来ていればいいと)
そしたらVS 2017 用 x86 Native Tools コマンド プロンプト(ここ大事、他だとハマるっぽい)
をスタートメニュー→すべてのプログラムあたりから引っ張り出して開いてこれもnginxのソースディレクトリに移動して
nmake
4790K@4.7GHzでも数分かかるので変な低スペ鯖にやらせるとしんどいかも
sedコマンドがねーって怒られるけれどファイルの移動しかしないっぽいので終わり
今回はbinary-x86フォルダに出力したのでそこからnginx.exeを、nginxディレクトリからconf,contrib,docs,htmlフォルダを引っ張ってきて終わり。まあ
こんなことする人は大体公式バイナリからの差し替えだろうしバイナリだけ持って行けばいいと思うけれど
でここまで出来たら差し替えてconf弄って終わり(参考URLを参考に)
c:\nginx>nginx -V
nginx version: nginx/1.15.7
built by cl
built with OpenSSL 1.1.1b-dev  xx XXX xxxx
TLS SNI support enabled
configure arguments: --with-cc=cl --builddir=binary-x86 --with-debug --prefix= --conf-path=conf/nginx.conf --pid-path=logs/nginx.pid --http-log-path=logs/access.log --error-log-path=logs/error.log --sbin-path=nginx.exe --http-client-body-temp-path=temp/client_body_temp --http-proxy-temp-path=temp/proxy_temp --http-fastcgi-temp-path=temp/fastcgi_temp --http-scgi-temp-path=temp/scgi_temp --http-uwsgi-temp-path=temp/uwsgi_temp --with-cc-opt=-DFD_SETSIZE=1024 --with-select_module --with-http_v2_module --with-http_realip_module --with-http_addition_module --with-http_sub_module --with-http_dav_module --with-http_stub_status_module --with-http_flv_module --with-http_mp4_module --with-http_gunzip_module --with-http_gzip_static_module --with-http_auth_request_module --with-http_random_index_module --with-http_secure_link_module --with-http_slice_module --with-mail --with-stream --with-openssl=objs/openssl-1.1.1 --with-pcre=objs/pcre-8.42 --with-zlib=objs/zlib-1.2.11 --with-http_ssl_module --with-mail_ssl_module --with-stream_ssl_module
ついでにCAAレコード登録
DNS CAAレコードに Let’s Encrypt 認証局を設定する | あぱーブログ
DNSレコードで対応してるところなら登録出来るのでする
ここで生成出来るけれど普通にそこまでしなくてもいい気はする
CAA Record Generator
Name	    Type	Value
”ドメイン名”	CAA	0 issue "letsencrypt.org"
ssl_dhparamはここがわかりやすそう
nginx : ssl_dhparamの有り無しでの挙動の違い – Qiita
あとLet’s Encryptを窓でやるときに
Releases · PKISharp/win-acme
使うんですけれど、VPN常時接続状態だと更新が通らない可能性があるので注意(ファイヤーウォールがなんとかって出た)
多分ちゃんと設定すれば平気なんだろうけれどね・・・
そりゃそうだろってことでルーティングテーブルかなんか弄ってどうにかしたけれど設定がまだちゃんと出来てなくっぽくてVPN接続先のネットワークからPC名で叩けないっぽい
それと証明書指定は
ssl_certificate		 なんとかかんとか-chain.pem;
ssl_certificate_key 	 なんとかかんとか-key.pem;
です。最初chainじゃなくてcsr使ってた。ので直した。
いうことは言った気がするのでこれで終わり(ハマり要素はnmakeする時のコマンドプロンプトを間違えるかどうかです)
っていうか本当にここどうにかしないとまずいね(未だにSSLすら非対応)(最大のオチ)
